I can't say what it is--the sunshine, the warm weather, the time spent outside--but this spring my skin feels great, and as a result, I don't feel like caking on as much
AND SO I present to you my EVER popular, MOST requested (okay, both of those are lies...), SUPER natural-looking (that part is true) mostly-drugstore Spring makeup look!
Like any good makeup look, I start this one by washing my face with a gentle cleanser, and applying a moisturizer and eye cream.
Concealer:
Step one for me is concealer. I do not typically wear a foundation, so it is even more important for me to blend my concealer in well! I use Maybelline Dream Matte Mousse in the shade Porcelain Ivory, and apply this on my eye area, both below my eye, in a triangle shape bringing it down to my cheek, as well as on top of my eyelid area.
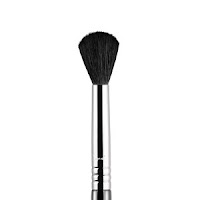
I also take this down around my nostrils and the corners of my mouth where I have a little redness. Although this product is technically a foundation, I think that it is light (as far as texture) and yet pigmented enough that it works as a concealer for me. I use a Sigma E40 brush to blend.
For my undereye area, I also layer on Soap and Glory's Kick Ass Blur & Brighten Concealer Crayon in the shade Light with the same Sigma E40 brush. This is an incredibly creamy, easy to apply concealer stick, and it blends in very well on top of my Maybelline Dream Matte Mousse.
LOVE LOVE LOVE this product! This may be a new HG concealer for me.


Powder:
I powder my entire face (including my eye area to help set the concealer) with Rimmel's Stay Matte powder with any fluffy brush I have on hand. Currently that brush is a travel-sized one from a Sephora kit. I purchase different powder shades depending on the season (and sometimes, what is in stock at the drugstore...), but I often opt for a very light yellow to help offset any redness in my face.
Bronzer:
Since my eyes and lips are fairly neutral, I opt for a fairly deep contour and highlight. I think that a well set face can help you feel made up, and yet, to others, they only notice the subtle glow that you seem to have. It's basically a win-win.My favorite bronzer at the moment is the Ulta brand Matte Bronzer. I use the shade "warm"--it has a yellow undertone which can look a little orange if too much is applied, but the "cool" shade just did not look right on me. I opt for a sculpted look, so I use a Sephora Collection angled face brush to apply. I start about two inches below my temples at my hairline where your cheek bone begins, and start applying the bronzer in the hollows of my cheeks, blending towards the corner of my mouth. I put the most color at my hairline, and it fades as it comes in to the middle of my cheek.
I blend the bronzer up on my forehead, right into the base of my hairline, and take a little bit down the sides of my nose.


Highlight:
To balance out the shadows that we created with bronzer, I use a synthetic eye brush to apply a cream highlighter on my brow bone, inner corners of my eye, down the bridge of my nose, on my cupids bow, and the tops of my cheekbones. (It sounds like a lot. And it can be, so use sparingly or risk looking like a disco ball!)My current favorite is MAC Cream Color Base in Pearl. This color is a BEAUTIFUL shimmery champagne color. Of course, based on your skin tone, be sure to pick a color that will suit you. I top this with a shimmery champagne color on a fluffy eye brush (no preference on this) powder highlight just for the purpose of setting the cream color I applied.
Blush:
Since I have a lot of redness in my face as it is, I tend to use blush VERY sparingly. At the moment I am using a Physician's Formula blush with a pink/red tone to it. Even though I use a light hand to apply this, I do feel that a little blush on the cheeks helps to pull together the highlight and contour to give a finished look.Eyes:
I apply a very natural looking cream eye base with my finger. My current fave is MAC's Painterly Paint Pot. I also dust the matte bronzer that I used to contour into my eye crease veryyyyyy lightly. I find that this gives a more completed look with very little effort, and since we are tying in the same bronzer shade, it helps make the completed look more natural.Mascara:
For this look, I skip the eyeliner and just got for a nice, thick coat of mascara. I start by curling my eyelashes with the Tweezerman Eyelash Curler, and apply L'Oréal Voluminous Waterproof Mascara in Black to both my top and bottom lashes. (Note: I go for the Original Waterproof version. I tried Carbon Black in the past, but even the waterproof version smudged! Very disappointing.)
And ta-da! Your natural makeup look is completed!
I think that this look is so pretty with the highlight and contouring, and it looks natural without heavy eye makeup. I even get compliments on how much my skin glows (but shhhhh! nobody has to know I'm wearing makeup!)
So, now that I told you about my go-to Spring makeup look--what is yours?!
I will see you next time,
xoxo


